Growing your own cannabis is so rewarding – you’re literally growing your own medicine while practicing patience and diligence during the whole process. Of course, the most fulfilling cannabis cultivation experience involves all aspects of the process: growing, harvesting, trimming, and curing. Though we’ve touched briefly on the basics of growing your own marijuana at home, we’d like to help you with the next few steps to get you smoking on your high-quality home-grown in only a few short weeks (or stashing it for the long haul if that’s your goal, too). When to Harvest Your Marijuana and Other Helpful Post-Grow Tips
How to Know When to Harvest Marijuana
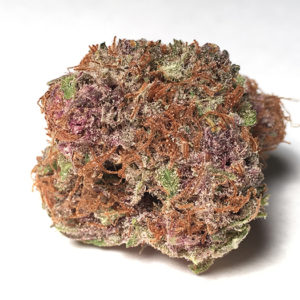
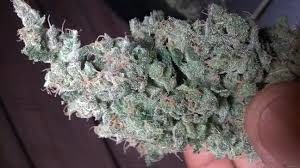
You’ve been watching your girls grow since day one and boy have they! The buds may be full or stringy depending on strain type and nutrient levels, and ideally will be coated with plenty of beautiful trichomes – that’s where all the terpenes and cannabinoids are! But is your marijuana ready to harvest? When to Harvest Your Marijuana and Other Helpful Post-Grow Tips
Unlike a tomato that will turn bright red and soften up to indicate ripeness, knowing when a cannabis bud is ripe takes a bit more investigation.
To yield the most potent cannabinoids from your marijuana plant, it is imperative that buds be harvested at the proper time. Harvesting too early may result in less potent cannabis and harvesting too late can result in a batch of sleepy weed. To nab those buds at the optimum time, pay close attention to the maturation rate of the flowers. When to Harvest Your Marijuana and Other Helpful Post-Grow Tips
The first indication of bud maturity can be noted as the pistils (those little white hairs) begin to shrivel and change color. Though this is certainly not the most effective way to judge ripeness, it can effectively show you when harvest time is approaching. This is also a good time to flush out excess nutrients using reverse osmosis water (and a lot of it) two weeks prior to harvest to improve flavor and reduce the harshness of the smoke.
As the pistils begin to change color, so will the little mushroom-shaped trichomes on your buds, though a high-powered microscope or macro will be necessary to observe this transformation. Though these “crystals” will begin completely clear, they will start to cloud up as the cannabinoids within them mature. When to Harvest Your Marijuana and Other Helpful Post-Grow Tips
Once trichomes become cloudy/amber in appearance, your buds are almost ready to harvest
Optimum harvest time is therefore when the trichomes are cloudy but before they turn amber as this is an indication of cannabinoid degradation. Though it will take some practice to get the timing right, comparing your buds to photos of ripening buds online can help.
Harvesting Cannabis Plants
After the buds have matured and the plants have been flushed of excess nutrients, it’s time to cut down your girls. For those harvesting indoor plants, larger fan leaves can be trimmed from the plant in the days leading up to harvest to increase airflow and light exposure to the buds, but outdoor plants (which already receive ample light and airflow) can remain completely intact until the big chop. When to Harvest Your Marijuana and Other Helpful Post-Grow Tips
Plants should be harvested just before their light cycle begins as this is the time most residual nutrients will be resting in the root and not the stem and leaves of the plant. To harvest, simply cut the whole plant from its base, leaving the stems intact to make hanging them easier. If the plant is too large, individual branches can be cut instead but note that extra branches are necessary for the initial drying process. When to Harvest Your Marijuana and Other Helpful Post-Grow Tips
Trimming Cannabis Plants
Trimming your buds improves their aesthetics and flavor while reducing unnecessary foliage. Though some growers may leave “sugar leaves” (the tiny leaves right next to the bud that often contains an abundance of trichomes) to slow the curing process, improve weight and add to potency, the smoke tends to be harsher and the leaves less flavorful. To get those beautiful dispensary-quality nugs, more careful trimming is a must. When to Harvest Your Marijuana and Other Helpful Post-Grow Tips
First, trim those sugar leaves by turning your plant upside-down and snipping them at their base with manicure scissors. In places where the bud is dense, just trim the leaf tips, shaping the nug into a tear-drop shape. Be sure to save your leaves and excess trim to use later by catching everything in a pan or trim bin. (Use a razor to scrape off some “scissor hash” along the way, too, because those suckers will get sticky!)
Trimming off all fan leaves and sugar leaves will result in a smoother smoke
After your buds are trimmed and shaped up, hang them in a dark room that’s between 60 and 70 degrees Fahrenheit and a humidity level between 45 and 55 percent to help your buds dry evenly. In about six to ten days, the stem should splinter slightly when bent but will not break indicating there is still moisture in the bud, but not much. When to Harvest Your Marijuana and Other Helpful Post-Grow Tips
Curing Your Cannabis for Optimum Flavor and Potency
Though you may be able to sample a bud after about four to seven days post-harvest, the best flavor (and longest shelf life) will come after a careful cure. This will pull excess moisture out through a sort of “sweating” process while helping preserve flavor and cannabinoid content.
To do this, just snip individual buds from their stems and add them to air-tight containers. Mason jars work well for most home grows though larger containers may be necessary for larger harvests. Basically, you just need something with a tight seal. When to Harvest Your Marijuana and Other Helpful Post-Grow Tips
The purpose of sealing your bud is to draw excess moisture out slowly by sweating it out at a temperature lower than 70 degrees. Remove this moisture by “burping” your containers a daily day for 10 – 30 minutes each day (just take the lid off) for the first two to three weeks. Jars can then be burped weekly for about two more months and after that (if you can go that long without smoking it) can be burped once a month for a total of six months of curing time. Though the process takes patience, a well-cured cannabis bud is worth the wait. There are definitely other methods of curing out there, but we’ve found a slow, patient cure provides the most rewarding aspects of both potency and flavor. When to Harvest Your Marijuana and Other Helpful Post-Grow Tips
You’ve put a lot of time into your cannabis grow, don’t skimp on the process now. By timing your harvest, hand-trimming your buds, and patiently awaiting the curing process, you can have high-quality cannabis right at home (and you can use the trim to make some awesome products, too!).